A fireplace can make a home feel cozy—until the chimney is blocked, damaged, or coated in creosote. A basic safety check helps you catch problems early, before you burn again.
In this guide, you’ll learn how to check a chimney for safety, how often inspections are recommended, what you can realistically evaluate yourself, and when it’s time to bring in a certified pro. If you live in Pittsburgh (or anywhere with freeze-thaw winters), you’ll also see a few weather-related red flags to watch for.
Important: This article covers visual homeowner checks. It doesn’t replace a professional chimney inspection—especially if you suspect structural damage, a blockage, or carbon monoxide risk.
Why Chimney Safety Matters
Burning wood (and even some gas appliances) can leave residue and debris in the venting system. Over time, that buildup and normal wear can turn into real hazards:
- Chimney fires: Creosote is a flammable byproduct of wood burning and a common contributor to chimney fires.
- Carbon monoxide (CO): A blocked flue, failed liner, or drafting problem can push carbon monoxide exhaust back into the home.
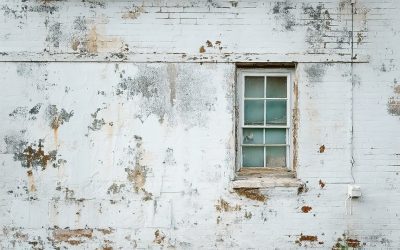
- Water damage: Leaks and freeze-thaw cycles can crack crowns, loosen mortar, and accelerate deterioration.
Dangers of Neglected Chimneys
- Creosote buildup: Flaky soot is a warning. Thick, shiny, tar-like deposits are higher risk and should be handled by a professional.
- Carbon monoxide exposure: CO is colorless and odorless. If alarms sound or you feel symptoms like headache or nausea, leave the home and follow emergency guidance.
- Structural deterioration: Cracked masonry, a damaged crown, and rusted metal components can worsen quickly once water gets in.
Who Should Prioritize Inspection?
-
- Anyone using a wood-burning fireplace, insert, or wood stove—especially in older homes
- New homebuyers (or anyone who just moved into a home with a fireplace they haven’t used yet)
- Landlords and property managers (requirements and documentation expectations can vary—check local rules and your lease obligations)
How to Check a Chimney for Safety: Step-by-Step DIY Guide
You don’t need specialty tools to spot many common issues. The goal is to identify clear warning signs—not to do risky roof work or deep flue cleaning yourself.
Quick Safety Rules Before You Start
- Only inspect a cold fireplace and chimney. Wait at least 24 hours after the last burn.
- Don’t go on the roof if you’re not experienced and properly equipped. Most exterior issues can be spotted from the ground with binoculars.
- If your CO alarm ever sounds, treat it as urgent. Stop using the appliance and follow the alarm instructions.
What You’ll Need for a Safe DIY Chimney Inspection
- Work gloves, safety goggles, and a mask (soot is messy and irritating)
- Bright flashlight and a small hand mirror
- Phone/camera for photos (useful if you call a pro later)
- Notepad for notes and dates
- Optional: binoculars (helpful for checking the cap/crown from the ground)
Exterior Chimney Inspection Steps
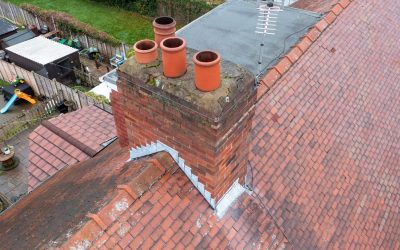
- Masonry check: Look for cracked bricks, crumbling mortar, leaning, and white staining (efflorescence), which can signal moisture issues.
- Crown + cap: Check that a cap is present, secure, and not rusted through. Look for cracks in the crown and gaps where water could enter.
- Flashing: From the ground (or an upper window), look for lifted, bent, or missing flashing where the chimney meets the roof—common leak points.
Interior Chimney Inspection Steps
- Firebox: Check for cracks, missing mortar, loose firebrick, or heavy soot piles. Hairline surface cracks can happen; wider gaps or loose pieces are worth a professional look.
- Damper: Open and close it fully. It should move smoothly and seal reasonably well. Heavy rust, binding, or missing parts are red flags.
- Up the flue (visual only): Use a flashlight and mirror to look upward. If you see thick deposits, debris, or daylight is completely blocked, stop and call a pro.
Smoke Chamber & Flue Assessment
- Creosote: Flaky black buildup is common with wood burning. Thick, shiny, or tar-like buildup needs professional cleaning.
- Blockages: Nests, leaves, and animal activity can obstruct the flue and create CO risk. Any suspected blockage is a “do not use” situation.
- Flue liner: Visible gaps, missing tiles, warped metal, or obvious damage suggest the system may be unsafe to operate.
Safety Features & Detectors
- Test smoke and CO alarms regularly and follow the manufacturer’s replacement schedule.
- If you use a wood-burning setup, confirm you have appropriate spark protection (such as a properly installed screen where needed).
- Locate and check clean-out doors (if applicable). They should open and close securely and not be rusted shut.
When to Stop & Call a Professional
- Any suspected blockage, animal nest, or strong smoke smell indoors
- Heavy creosote or thick soot you can’t easily assess
- Cracked masonry, missing liner sections, water pooling, or signs of a chimney shifting/leaning
- Drafting problems (smoke spilling into the room) or repeated alarm alerts If any of the above shows up, don’t “test it with a small fire.” Keep the system off until it’s inspected.

How Often Should Your Chimney Be Inspected?
A common rule of thumb is an annual review for active systems, with additional checks after major changes or damage.
General Inspection Recommendations
- Annual inspection: Many industry guidelines recommend at least a yearly inspection for fireplaces, chimneys, and vents that are in use.
- After changes: Get inspected after a new appliance install, a liner change, a chimney fire, or significant storm damage.
Factors That Can Increase Inspection Frequency
- Heavy use: Daily burning in winter can justify a mid-season check.
- Fuel quality: Wet/unseasoned wood increases creosote and smoke.
- Weather exposure: Pittsburgh’s freeze-thaw cycles and wind-driven rain can speed up masonry wear—watch crowns, mortar joints, and flashing closely.
The Chimney Inspection Checklist
| Area to Inspect | What to Check | Action Needed? |
|---|---|---|
| Chimney Exterior | Cracks, loose bricks, mortar gaps, leaning, white staining, water marks |
|
| Chimney Cap & Crown | Cap present/secure, rust holes, crown cracks, gaps where water can enter |
|
| Flashing (Roof Line) | Lifted flashing, missing sealant, staining on nearby ceilings/walls |
|
| Firebox | Loose firebrick, widened cracks, missing mortar, heavy soot piles |
|
| Damper | Smooth operation, obvious rust, missing parts, poor sealing |
|
| Flue / Smoke Chamber | Creosote level, debris, nests, damaged liner sections |
|
| Smoke & CO Alarms | Test function, proper placement, replacement date per manufacturer |
Chimney Maintenance Tips to Keep Your Home Safe
Small habits reduce buildup, limit moisture damage, and make professional cleanings faster (and often cheaper).
Repointing and Mortar Joints: What Homeowners Should Look For
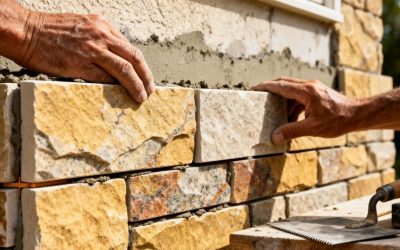
If the brick looks fine but the mortar joints are crumbly, recessed, or washing out, your chimney may need repointing (also called tuckpointing). Repointing is the process of removing deteriorated mortar and packing new mortar into the joints to restore strength and keep water out.
- Common repointing signs: Missing mortar, sandy mortar dust at the base, gaps you can fit a key into, or joints that look “scooped out” between bricks.
- Why it matters: Once water gets into open joints, freeze-thaw cycles can break down the chimney faster and lead to loose brick, leaks, and interior staining.
- DIY or pro? Small cosmetic touch-ups are one thing, but true chimney repointing is masonry work. Mortar type and joint depth matter—especially on older homes—so it’s usually best handled by a qualified mason.
Cleaning and Preventing Buildup
- Burn seasoned wood and avoid trash, glossy paper, or treated lumber.
- Remove cooled ash into a metal container with a lid and store it away from combustibles.
- If you see buildup after only a few fires, reduce use and schedule a cleaning—your wood or draft may be the issue.
Repairing and Weatherproofing
- Address small mortar cracks early. Water + freezing temperatures can turn small gaps into major repairs.
- Maintain a functional cap and consider a properly installed cover to reduce rain and animal entry.
- If you waterproof masonry, use a breathable product intended for chimneys so moisture isn’t trapped inside the brick.
Pittsburgh-Specific Chimney Safety Tips
- Plan a visual check in early fall and another quick look after winter. Freeze-thaw damage often shows up as cracked crowns and crumbling mortar joints.
- After windstorms, look for missing caps, shifted tops, or new staining—then pause use until it’s evaluated.
- When hiring help, look for clear credentials (for example, a CSIA-certified chimney sweep) and ask for photo documentation of findings.
Professional Chimney Inspection: When and Why to Hire an Expert
A certified inspector can evaluate hidden areas, measure creosote depth, confirm proper clearances, and identify liner failures that aren’t visible from the firebox.
What to Expect During a Professional Inspection
- Level 1: Routine inspection of accessible portions of the chimney and appliance connection when no changes are suspected.
- Level 2: Common for home purchases, appliance changes, or after an event like a storm. Often includes camera scanning of the flue.
- Level 3: Invasive evaluation when serious hazards are suspected; may involve opening concealed areas.
Ask for a written report with photos. It’s helpful for planning repairs, permits, and documenting maintenance history.
New Technologies in Chimney Inspection
- Video scanning: Helps spot liner damage, blockages, and buildup higher up the flue.
- Thermal imaging: Can reveal abnormal heat patterns that suggest gaps, leakage, or hot spots in adjacent materials.
- Photo documentation: A good company will show you what they see before recommending major work.
Frequently Asked Questions (FAQs)
Can I safely inspect and clean my chimney myself, or should I always hire a pro?
What are the first warning signs my chimney may be unsafe?
How do I know if my Pittsburgh-area chimney needs extra attention due to local weather?
Does homeowner’s insurance require a professional chimney inspection for coverage?
What should I do if I find a bird nest or animal blockage in my chimney?
Are there smart devices that make chimney safety easier?
Your Next Steps: A Simple Decision Checklist
One good habit: take photos every fall from the same angles (firebox, damper area, and the chimney top from the ground). It makes changes obvious year to year.
- If you haven’t used the fireplace in a year (or you just moved in): schedule a professional inspection before your first burn.
- If your DIY check shows cracks, heavy buildup, leaks, or blockages: stop using the fireplace and call a certified chimney pro.
- If everything looks clean and intact: document the date, keep the checklist on file, and plan your next inspection based on how often you burn.